Showing posts with label recipe. Show all posts

Saturday, August 29, 2009

Recipe: Seasoned Grill Fries with Dip


This incredibly simple yet versatile recipe requires a little bit of inside preparation before cooking, but is well worth it in the end.

Required:

3-6 large russet potatoes of roughly similar size
olive oil, preferably in a pump sprayer bottle
salt and pepper, any additional seasonings you like
2 cups of sour cream
1 cup BBQ sauce (you can guess which kind I prefer)

Take the potatoes and clean them under running water with a stiff bristled brush to get all the stuff off the skin. These used to live in the ground, remember?

Put them all in a large stock pot and fill with cold tap water to about 1" above the line of the potatoes. Put on stove over high heat until boiling; pot can be covered to speed up the process, but remember to remove the lid once the boiling starts unless you really enjoy cleaning your stovetop.

Allow potatoes to boil in the water for around 15 minutes and then remove from heat and drain. Let them cool for around 10 minutes to make them easier to cut without smashing. Boiling them first allows the outer parts of the potato to partially cook through, leaving the remaining inner sections (the ones that will be thinner once you cut them into wedges) to be cooked on the grill. If you boil them the right amount you'll see a line when the potato is cut in half where the very center section is still completely uncooked.

Once cool, cut potatoes into wedges using a sharp knife; I usually get 12 wedges per potato by quartering the potato first then cutting three wedges out of each quarter. For really large potatoes you might want to cut each quarter into 4. I'll leave it up to you, but don't call me in the middle for help.

Arrange the wedges skin side down on some type of large platter or cooking sheet and spray or brush lightly with olive oil.

Season the potatoes with spices you like and that go well with the food you're cooking. I always start with salt and pepper, but use things like ancho chili powder and dried cilantro flakes to give them extra flavor. You could always used a prepared spice blend as well, such as lemon pepper, cajun seasoning or even Old Bay. Make sure you get a good coating of stuff on them, as some of it is going to fall off while you're grilling. If you're putting them on the grill an you notice a side that looks a little light on the seasoning, you can always rub the potato in the residual oil and spices left on the platter that didn't land on potatoes the first time around.

Make sure your grilling surface is cleaned off; oil or non stick spray is usually not necessary. These are best cooked over indirect heat with the lid on, but can be flipped over the coals to really crisp them up if you like. When they're cooking at the right temperature they'll make a whistling noise as they cook. You'll know they're done when the outer part of the potato is a medium brown and starts to bubble up a little.


Mix the two cups of sour cream with about a cup of BBQ sauce for a delicious dip. Make sure you keep this in sight however, or you'll spot people putting it on their burgers before the fries are even done.


Feel free to experiment with different seasoning and dip combinations; I've probably made these a few dozen times and they've always been delicious. Ranch dressing with a bit of hot sauce is always a great combination as well.

Give them a shot, I'm sure you'll make them again and again.

Recipe: Grilled Thai Chili Glazed Chicken

I was sitting for about ten minutes in the produce section of the supermarket trying to figure out what I wanted for dinner, but wanted to use up some of the stuff I had in the house before buying a ton of fresh ingredients. I ended up walking out with three limes, a fresh ginger root and a clove of garlic for the modest price of $2.49 American. Ginger and garlic are included in a lot of the asian cooking I do, so I knew I was off to a good start.

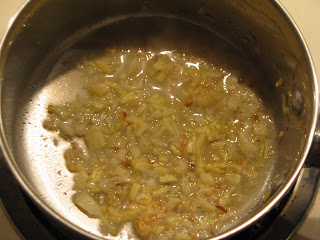
I started by dicing up some of the garlic and ginger and toasting them in a little oil. I usually season the oil this way when I cook with a wok, but haven't really tried it as the beginning of a glaze before. Once my kitchen smelled like a Chinese restaurant, I added the juice of two limes and the zest of one. Then 2 cups of honey and 2 Tbsp of Sriracha chili sauce got dumped into the pot. I continued to simmer this mixture for a few minutes to allow it to reduce slightly, then removed it from the heat to allow it to cool off before I had to cook with it. Once cooled, the glaze will be much thicker and stick to the chicken on the grill more easily than at a warmer temperature.


I seasoned three boneless, skinless chicken thighs with salt and dried cilantro flakes and went outside to get the grill set up. I used about 3/4 of a chimney starter all on one side of the grill so I could do higher heat indirect grilling; once the chicken started to firm up, I brushed the glaze on every few minutes, flipping them over every other time. The glaze stuck well, and many of the garlic and ginger pieces were stuck to the outside of the chicken for a good long time allowing it to soak up the flavor as it cooked.

As you can see in the picture, the glaze stuck to the grill grates as well; the excess that dripped down into the bottom of the grill actually solidified and stuck my lower vent to the inside of the bowl. Once a fresh batch of coals were dropped in the next day it freed up again as the honey warmed up.

Before going outside I set up my steamer to cook some sushi rice to go with the chicken, but ran out of time for a vegetable. Oh well, something to remember for next time.


After plating the chicken I put little drips of Sriracha all over, and piled the rice up to the side. The honey, lime and chili flavors work well together, I can't wait to make this again. Never be afraid of fresh ginger, no matter how ugly it looks.

Sometimes the best recipes are the ones you make up as you go along...

Monday, August 10, 2009

Grilled Vegetables

After sampling some grilled zucchini at The Taproom, I've been meaning to recreate them on my own. Back home, my mom would throw any vegetable you could think of on the grill and I definitely owe my love of grilled veggies to her. Seared flesh, whether vegetable or animal, is never unwelcome on my grates.

During the work week, I won't get home til about 7 o'clock which doesn't leave a lot of time for finding fresh produce or hitting any of the plethora of farmer's markets in the city. Last week, I was searching for produce stands around the chadds ford area, which is where I work, and came upon a listing of farm stands in the Brandywine Valley. SIW Vegetables is located on south creek rd. just off of route 1, south of 202. During lunch last week, I took a drive to check it out and it was everything I hoped for. Multiple wagon carts held all kinds of just picked veggies and fruits. Knowing me, you can guess I zeroed right in on the tomato cart. Heirlooms, Uglies, Grapes, Jersey's, I was in heaven. Corn on the cob, squash and zucchini soon found their way into my bags as well. I'm ashamed to admit, I've been slacking on the corn on the cob this year and fully intend to make up for it. A ten spot later and I was on my way. This farm will definitely be a weekly trip for me and I'm considering joining their CSA next year.

So onto tonight's grill.

Corn on the cob.
Growing up in southeastern Pennsylvania meant that every summer, you could count on eating corn on the cob multiple times a week. At least in my house anyway. To this day, my parents still have the same propane burner setup and huge aluminum pan that spent as much time poolside as we did. Always full of water, always filled to the brim with dozens of ears of corn.

Now there are a few different ways to cook corn on the cob and everyone has their favorite. My go to method is simple. I will pull the corn husks down but not off and get rid of all the corn silk. Pull the husks back up and recreate the cocoon around the corn. The husk will act as an insulator and keep the corn from scorching.


Once I've got my coals ready, I'll arrange them centrally in grill so I can use the edges of the grate for the corn. Putting the ears directly over the coals will have the heat burning thru the husks in no time so set up your grill however you prefer for indirect heat.


Those are gonna sit and roast for about 20-30 minutes like that. Meanwhile, I sliced up some zucchini and yellow summer squash and hit them with some olive oil from the Misto. The misto is a pump action oil sprayer that Scott found and we both use it religiously. After a quick spray of olive oil, I dusted the veggies with some garlic pepper and set them aside.


Checking on the corn, I'll see if it's starting to shrivel at all and make sure to rotate the ears for even cooking. Hell, take a small bite and see how far along it is. You'll notice the outer layer of husks with start to dry up and brown but the inner layers are still protecting the corn from damage since they're loaded with water. Here I pulled them off and hit them with a blend of butter and olive oil from Olivio that's readily available in any dairy section. Quick season with salt and pepper, pull the husks back up and thrown back on the grill.


Some people will use grill baskets to grill vegetables or smaller items that can fall through the grates but I usually cut whatever I'm grilling longways so I can avoid that. You may lose a few men along the way but it's a price I'm willing to pay for grill marks.


Obviously your cook times will vary depending on how thick you cut the veggies but they don't usually take very long. I had these on for about 10 minutes with a flip in the middle.


End Scene


what are you gonna grill next?